|
Now
You Can Make Your Own Stencils with Your Own Artwork or Designs In Minutes
using your computer and the New Stencil Makers (Shown Below) And Each Stencil Will Make
Hundreds
Of Marks On
Glass,
Metal,
Wood,
Fabric,
Paper,
Plastic,
Signs, Cardboard,
Marble,
Ceramics
Or Hundreds Of Other Items. And Best Of All, You Can
Use Your Stencil
Over And Over
And Go From One Project To Another. You Can Use
Paint,
Glass
Etching Cream,
Metal
Etching
Electrolyte
and Even Ink To
Print, Paint, or
Etch On Almost Anything!
This
is NEW and there is Nothing Like It Available Anywhere on the Net!
You
can be First to Explore All the many different ideas these Stencils are
capable of creating. Use them for Your Craft or Hobby Projects or in
Your Business or even START A NEW BUSINESS with these easy to make,
Premium Quality Stencils! There are so many Thousands of ways You can
use YOUR Ideas and these Revolutionary New UNIVERSAL STENCILS that we
can't show them all here.
New Universal Stencil
Explained:
YOU make these
Stencils, using YOUR own Computer and Your Own Ideas,
Copy, Artwork, Trademark, Logos or Drawings (Even Intricate and
Complicated Ones) in Your own Shop, Home or Office in Just Minutes…and
they are Permanent and are Reusable Hundreds of times.
You can make
stencils that were "Never Before Possible" with great detail and you can
let your Creative Talent run Wild and do hundreds of projects that were
way too complicated before but now are very easy.
No More Exacto Knife:
Here
is a quick glance at what you can do with these stencils. First of all
you can now make extremely Complicated Stencils like shown below
in just minutes. Can You even Imagine how difficult it would be to
make the stencil below the old way of "Cutting Out Vinyl" with an Exacto
Knife or Razor Blade and it would only be good for One Use??? This is So
Much Easier, Cheaper and Faster and the results are superior to
anything that can be "Cut Out".
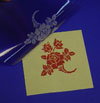
(Stencil in Blue Shown on Green Poster Board below)

You can easily Etch, Print or Paint ALMOST ANYTHING with it like this..
(Used
Red Water Based Acrylic Paint on Green Poster Board here)

 2 Free
E-Books On How To Make Money On EBay & Craigslist! 2 Free
E-Books On How To Make Money On EBay & Craigslist!
We want to
help all of our customers use their Ideas and
Talent to make Extra
money during these tough times so we are
offering You 2 Free E-Books To help You sell
your Crafts or Products.
Click on the Shopping Cart Link below
Fill out the required info and you're on your way!
NOTE: There is No Catch to this…it's Free
Download Your
2 Free E-Books

We Never Sell Your Email to Any List - They are kept Private.
|
Or
You can make a Simple Stencil
And Mark anything "In Between" such as:
Now you are beginning to really get the
Idea...
These stencils have Unlimited uses and You will have Fun simply
Exploring all of the different ways you can use them. So now take
just a Minute and read below and see how very easy it is to make one of
these New Universal Stencils.

| 1. Create Your Stencil Copy
- No Special Software Needed! |
 |
Create your Copy, Designs or Artwork on Your computer
using almost any software that you already have.
|
| 2. Print Your Transparency In
Seconds. |
 |
Print the design in Black Ink onto
a transparency which comes in each kit.
Note: Be Sure that it
prints out as Black as possible so you will have an excellent
stencil created. |
| 3. Here Is The New Mark 440 Stencil Maker |
 |
Here is one of the Three New Stencil Makers.
(We have different sizes so you can make stencils from 4"x 4" up
to large stencils 10"x 12").
To get your Stencil Maker ready to go
simply plug it into any electrical outlet and remove the tray
with the glass and black rubber pad so that you can "Load" it
with your Undeveloped Stencil and your printed
Transparency. |
| 4. Stencil, Transparency And
Glass On Exposure Tray. |
 |
Place your transparency directly on the
undeveloped stencil. (You can place the transparency copy
either right side up or upside down.)
Simply lay the
transparency on the stencil and place the glass on TOP OF THE
TRANSPARENCY. This is to hold the copy in place during
exposure. |
| 5. Expose The Stencil Material
|
 |
Now slide this tray with your Transparency, and your
Unexposed stencil covered with a glass plate (to keep the
stencil and copy from moving during exposure) into the exposure
unit as shown at left.
Turn on the unit, set the timer
(comes in kit) and expose the stencil for 2 to 3
minutes. |
| 6. Peel The Protective Mylar Backing
Off The Stencil. |
 |
After the short exposure simply remove the tray, and take
out the exposed stencil.
The stencil has a thin clear Mylar
covering on BOTH
SIDES.
You'll need to remove both pieces in order for the
developer to work. Simply separate the clear backing from the
blue stencil at a corner and peel it apart. |
| 7. Develop The Stencil For
2 to 3 Minutes |
 |
Place the stencil in a pan of developer provided in the
kit. Use a sponge to
gently wipe away the unexposed parts of the stencil. This will
be the part that will etch.
As the stencil develops, you will see the light parts
getting even lighter, and you will be able to feel the light
parts get slightly rough.
Once
the stencil is completely developed, wash all of the developer
fluid off of the stencil under running water. Use a paper towel
to blot dry the stencil. |
| 8. Blow Dry the Stencil |
 |
Helpful Note: To make sure that the stencil is
completely dry, use a blow-dryer to dry the stencil on both
sides.
This
makes the stencil easier to handle and it is now ready for Ink,
Paint, Metal Etching Electrolyte or even Glass Etching Cream.
When you are finished with the stencil you should clean it
up with water and DRY IT AGAIN FOR STORAGE).
You can use it many times if you take care of it and keep it
DRY. |
| 9. Here Is Your Complete Stencil
Ready To Use On Almost Anything. |
 |
Now that your stencil is dry it is ready for printing,
painting or etching.
If you are painting simply select
your Substrate (Technical name for anything you want to paint on)
and place the stencil in position. |
| 10. Apply Your Paint Or Ink To
Squeegee |
 |
If you are going to paint you will need to use a Squeegee. Select your paint and then
put a small amount of your desired paint on the squeegee as
shown.
A little bit of paint or ink goes a long way but
you need to be sure that you use enough to "fill" the stencil. One or two strokes on your stencil and you will be able to
easily determine the right amount of paint to use.
NOTE: We have experimented with many
paints and the ones shown below have proven to be the BEST by
far. |
| 11. To Make A Print On
Anything, Position Your Squeegee As Shown. |
 |
Position your paint covered squeegee on the
stencil. Now PULL the Squeegee firmly across the
stencil in ONE SMOOTH STROKE using light to medium hand
pressure. |
| 12. Remove Your Stencil And Enjoy Your Printed Artwork |
 |
Now hold the stencil on one edge so it will not move and quickly Lift Up the stencil
from one end so as not to "Smear" the
ink or paint on your substrate.
Here's what your artwork will look like when it's done.
This is indeed "One Stroke" painting.
Also you can make
your print in different colors by "Blocking Off" parts of your
stencil with "Non Stick Tape" to keep the different colored
paints from printing as you complete your multi-colored print as
shown here (inset picture). |
|
Transparency Film |
 Transparencies
are used for printing the copy or designs created on your computer. They
are then placed in the
UV Dura-Film Stencil
Maker
and transferred onto a piece of unexposed Dura-Film stencil. Please
specify laser or inkjet, depending upon the type of printer you use. Transparencies
are used for printing the copy or designs created on your computer. They
are then placed in the
UV Dura-Film Stencil
Maker
and transferred onto a piece of unexposed Dura-Film stencil. Please
specify laser or inkjet, depending upon the type of printer you use. |
|
Available Size: (Inkjet and Laser Available) |
| 10 Pack 81/2"
x 11" |
$19.95 |
ORDER NOW! |
Use Your Talent &
Ideas to Have Fun
There you have it...A New Stencil Making System that will
open up
a world of Great New Possibilities for you and allow you to use Your Talent and
Ideas to have a lot of Fun and make some real Money. You
are only limited by your own Imagination and Energy. So now is the time to
let your Artistic Ideas flow and enjoy creating things you have put off before
as too much work....especially if the artwork had to be repeated over and over
again or was quite complicated.
This new system cuts through all of that
and Frees You up to "Multiply" yourself if you are creating any item or artwork
that needs to be "Produced" in almost any amount.
Save Time & Money!
Now you can really Enjoy your Crafts knowing that you are
Saving
Time, Money and a Ton of Work using these New Stencils and also knowing that
many New Ideas are now open to you.
Be Sure And Take Advantage of the Special Low Prices on
these New Kits during this Limited Time Offer.
Simply decide on the
actual Size of the Stencil you may want to use....such as 5"x 6" or 6"x 8" or
10"x 12" and let that help you decide on the kit you will find the most
Economical for You.
|
Site
Map
Martronics
Corporation
PO BOX 200/500 Wilcox RD, Salkum, WA 98582
Ph:800-775-0797 Fax:360-985-2996
Email - Click Here
| |