Have You Ever Wanted To Put Your Own Artwork, Designs, Ideas or Text Copy On A Craft Project But Didn't Want To Spend Hours Painting Each Item By Hand?

Now You Can Do this Quickly and Easily by using Your Own Artwork, Copy or Designs and putting it on a New Universal Stencil that You Can make In just Minutes using Your own computer and the New Stencil Maker Kits (Shown Below). And Each Stencil Will Make Hundreds Of Marks On Glass, Metal, Wood, Fabric, Paper, Plastic, signs, Cardboard, Marble, Ceramics Or Other Items. And Best Of All, You Can Use Your Stencil Over And Over And Go From One Project To Another. You Can Use Paint, Glass Etching Cream, Metal Etching Electrolyte and Even Ink To Print, or Paint On Almost Any Project!
Here is How! Simply use Your computer to create any Design you want to put on any Project Material. Once you have the Design or Artwork on your computer, then print it out on a transparency sheet (which comes in the kit) and use that transparency with one of our New Stencil Maker Kits (which are shown below), to make a finished Universal Stencil which you can use with a Special Water Based Acrylic Paint to put your creation directly on all of the materials shown on this website (And Hundreds More).
It is that Simple and takes only about 5 Minutes to make a stencil which can be used hundreds of times and can be used on Glass one minute, Metal, the next minute and then you can switch to painting Wood, Fabric, Plastic, Paper or anything else in just Minutes. This is New and there isn't anything like this available on the Internet Today that even comes close to comparing. Take a few minutes and look through this website and you will see how Easy it is to Make and Use these new Universal Stencils. On the Home Page you will see how to make a stencil in minutes and on the other pages you will see how you can use your Stencils in Thousands of ways and on Hundreds of different materials or Projects.
HERE IS A QUICK SUMMARY
-
You can make a Universal Stencil in 5 minutes that can be used to Paint, Print or Etch on almost Anything.
-
You use Your Own Computer and Artwork, Text Copy or Designs to put on Your stencils. (The only restriction is you can not do photos)
-
Your Stencils can be used Over and Over Dozens of times on Different Projects and with Different Paints.
-
You can Etch Any Metal in Seconds
Check Out Metal Etching Here.
-
You can Etch Glass, Porcelain, Ceramics
Check Out Glass Etching Here
-
You can Store your Stencils and use them over and over again anytime.
-
You can use your Stencils "Like a Rubber Stamp" by simply laying them on any material (Like a Scrapbook) and using any paint or ink and you can use Any Color.
-
You can use them just like you would "Art Rubber Stamps" and this means you can "Create your Own Art Stamp Design on your stencil." Also your Stencil Maker will make actual Art Stamps and you can check it out here. Check Art Stamps
-
You can use Your stencils to put Repeat Designs on whatever you wish to paint or simply paint your designs using the stencils.
-
You can use the SAME STENCIL to put on Different Colors by simply Covering Up Certain Parts of the Stencil with non-stick Scotch tape and using different paint.
-
You can use your stencils to Start a New Business or Improve the products of an existing business. There are literally Thousands of ways to use these Universal Stencils to have real Fun and to Make Real Money!
This list could go on and on but You "Get The Picture". These New Universal Stencils, which can be easily and inexpensively made with the Stencil Maker Kits shown below, are an Artists or Craft Person's Dream come true since they have the Potential to help you do almost anything you have ever wanted to...and do it Quickly, Easily and Inexpensively.
  
With these Stencils You can simply "Go Wild" and let your Artistic Talent and Ideas flow like never before. Now is the time to completely Explore this website and see all the Great Ideas that are now available to you with these New Stencil Making Kits. Here is another Great New "Green Idea": Make your own "Shopping Bags" like shown below in minutes.
   
Above are just a very few Ideas of the Craft Projects that You can do with these New Universal Stencils Quickly, Easily and Very Inexpensively. You can easily think of Hundreds more.  Why not take a serious look at this New Idea that you can easily use for Fun and Profit. We've created a system that allows you to turn your Artwork and Ideas into Reality, and it just Doesn't Get Much Easier Than This. You will be able to Create The Arts and Crafts That You've Dreamed Of, but thought would be to Expensive to Create. Thinking of starting a business based on your craft? This stencil method will Save you Hundreds of Dollars and Hours or Time. Just in it for the fun? You'll be able to finish more projects, and Create more of your Dream Projects than Ever. Why not take a serious look at this New Idea that you can easily use for Fun and Profit. We've created a system that allows you to turn your Artwork and Ideas into Reality, and it just Doesn't Get Much Easier Than This. You will be able to Create The Arts and Crafts That You've Dreamed Of, but thought would be to Expensive to Create. Thinking of starting a business based on your craft? This stencil method will Save you Hundreds of Dollars and Hours or Time. Just in it for the fun? You'll be able to finish more projects, and Create more of your Dream Projects than Ever.

| 1. Create Your Stencil Copy, Artwork Or Design On Your Computer. |
 |
Create your Copy, Designs or Artwork on Your computer using almost any software that you already have. Print the design in Black Ink onto a transparency which comes in each kit. Be Sure that it prints out as Black as possible so you will have an excellent stencil created.
|
| 2. Print Your Transparency In Seconds. |
 |
Print out your copy or designs on a transparency sheet which is included in each kit. It should look like the one at the left. There is actually a Transparency here in the photo, even though it is hard to see. Once printed in black it is now ready to use to make a stencil. |
| 3. Here Is The New Mark 440 Stencil Maker (Other Stencil Makers Shown Below) |
 |
Here is one of the Three New Stencil Makers. (We have different sizes so you can make stencils from 4"x 4" up to large stencils 10"x 12"). You will find more on all of the Stencil Makers Below. To get your Stencil Maker ready to go simply plug it into any electrical outlet and remove the tray with the glass and black rubber pad so that you can "Load" it with your Undeveloped Stencil and your printed Transparency. |
| 4. Stencil, Transparency And Glass On Exposure Tray. |
 |
Place your transparency directly on the undeveloped stencil. You can place the transparency copy either right side up or upside down. The stencils DO NOT have a top or bottom at this point. Simply lay the transparency on the stencil and place the glass on TOP OF THE TRANSPARENCY. This is to hold the copy in place during exposure. On some kits you will find two clamps to put one each side to hold the glass even more firmly. |
| 5. Expose The Stencil Material |
 |
Now slide this tray with your Transparency, and your Unexposed stencil covered with a glass plate (to keep the stencil and copy from moving during exposure) into the exposure unit as shown at left. Turn on the unit, set the timer (comes in kit) and expose the stencil for 2 to 3 minutes. |
| 6. Peel The Protective Mylar Backing Off The Stencil. |
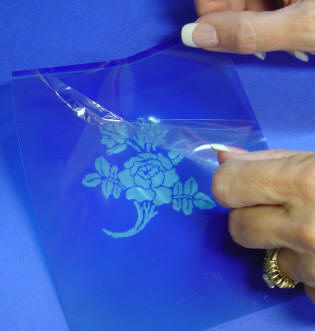 |
After the short exposure simply remove the tray, and take out the exposed stencil. The stencil has a thin clear Mylar covering on BOTH SIDES. You'll need to remove both pieces in order for the developer to work. Simply separate the clear backing from the blue stencil at a corner and peel it apart. |
| 7. Develop The Stencil For 2 to 3 Minutes |
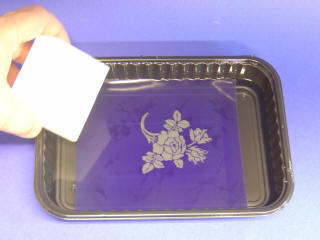 |
Place the stencil in a pan of developer provided in the kit. Use a sponge to gently wipe away the unexposed parts of the stencil. This will be the part that will etch. As the stencil develops, you will see the light parts getting even lighter, and you will be able to feel the light parts get slightly rough. When all of your design feels rough and looks evenly light, take the stencil out of the developer. Once the stencil is completely developed, wash all of the developer fluid off of the stencil under running water. Use a paper towel to blot dry the stencil. |
| 8. Blow Dry the Stencil |
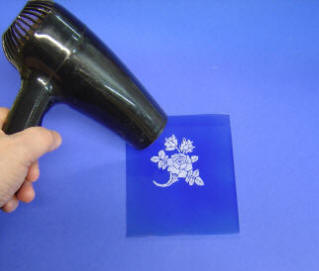 |
To make sure that the stencil is completely dry, use a blow-dryer to dry the stencil on both sides. This makes the stencil easier to handle and it is now ready for Ink, Paint, Metal Etching Electrolyte or even Glass Etching Cream. (Also when you are finished with the stencil you should clean it up with water and DRY IT AGAIN FOR STORAGE). You can use it many times if you take care of it and keep it DRY. |
| 9. Here Is Your Complete Stencil Ready To Use On Almost Anything. |
 |
Now that your stencil is dry it is ready for printing, painting or etching. If you are painting simply select your Substrate (Technical name for anything you want to paint on) and place the stencil in position. |
| 10. Apply Your Paint Or Ink To Squeegee |
 |
If you are going to paint you will need to use a Squeegee. Select your paint and then put a small amount of your desired paint on the squeegee as shown. A little bit of paint or ink goes a long way but you need to be sure that you use enough to "fill" the stencil. One or two strokes on your stencil and you will be able to easily determine the right amount of paint to use. (NOTE: We have experimented with many paints and the ones shown below have proven to be the BEST by far.) |
| 11. To Make A Print On Anything, Position Your Squeegee As Shown. |
 |
Position your paint covered squeegee on the stencil. Now PULL the Squeegee firmly across the stencil in ONE SMOOTH STROKE using light to medium hand pressure. (You will note that in this photo we have put a piece of Mylar with a square hole in it and attached the stencil with cellophane tape to give it more rigidity and make it easier to handle. You may want to try this as it also makes it easier to store for future use.) |
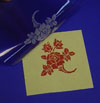
| 12. Remove Your Stencil And Enjoy Your Printed Artwork |
 |
Now hold the stencil on one edge so it will not move and quickly Lift Up the stencil from one end so as not to "Smear" the ink or paint on your substrate. Here's what your artwork will look like when it's done. This is indeed "One Stroke" painting. Also you can make your print in different colors by "Blocking Off" parts of your stencil with "Non Stick Tape" to keep the different colored paints from printing as you complete your multi-colored print as shown here (inset picture). |
There you have it...A New Stencil Making System that will open up a world of Great New Possibilities for you and allow you to use Your Talent and Ideas to have a lot of Fun and make some real Money if you so desire. You are only limited by your own Imagination and Energy. So now is the time to let your Artistic Ideas flow, creating things you have put off before as too much work...especial if the artwork had to be repeated over and over again or was quite complicated. This new system cuts through all of that and Frees You up to "Multiply" yourself if you are creating any item or artwork that needs to be "Produced" in almost any amount.
Now you can really Enjoy your Crafts knowing that you are Saving Time, Money and a Ton of Work using these New Stencils and also knowing that many New Ideas are now open to you. So take a few moments and examine this site and consider all of the ideas that you can easily use and Be Sure And Take Advantage of the Special Low Prices on these New Kits during this Limited Time Offer. Simply decide on the actual Size of the Stencil you may want to use....such as 5"x 6" or 6"x 8" or 10"x 12" and let that help you decide on the kit you will find the most Economical for You.
Order Your Stencil Maker Kit Now While These Low Prices Last!
|


 Here Is A Great Way To Get Started!